It was lovely to be
asked by the Artists and illustrators Magazine to contribute an article for
their June issue! I thought that I would post the whole article here for anyone
outside the UK.
City Sketching
“See the world one sketch at a time.” This is
the mantra of the worldwide Urban Sketchers (USk) community, originally started
in an online forum by Seattle-based artist and illustrator Gabi Campanario. The
London USk Chapter formed in 2012 with six members - James Hobbs,
KatherineTyrrell, Zhenia Vasiliev, Adebanji Alade, Barry Jackson and Olha Pryymak - and
this year celebrates its tenth anniversary. The London chapter’s popularity has
grown and at the meet up in February this year, there were over sixty people
sketching throughout the day.
After starting a drawing blog a decade ago, I
was so excited to discover the community and find that there were other people
in different parts of the world who liked sitting on street corners, drawing
their urban surroundings and recording everyday life in their sketchbooks!
It took going to several events before I started
to recognise faces and chat to others in the group. It doesn’t matter if you
are a complete beginner or an experienced artist: all are welcome. After we
have finished drawing, there is usually a chance to go to a cafe or pub to
share sketchbooks, talk art materials and get to know each other a little
better.
There is a line from American poet Mary Oliver
who writes, “To pay attention, this is our endless and proper work.” As an
Urban Sketcher, I feel this sums up what I am doing when I am out drawing on
location. Regardless if where I am feels quite ordinary, I notice so much about
the people and places around me.
The sketch in the step-by-step photographs was
drawn at the February London USk meet up. The location was Sloane Square in
well-heeled Chelsea and the weather obliged to make it a lovely day for sitting
outside and drawing in sketchbooks. I moved away from the main Square and
wandered around the nearby streets before settling on this view of one of the
very grand red brick mansion blocks. A low windowsill on a building being
renovated seemed a handy spot to draw from, so I perched there to make this
sketch.
Step One
I started with some very quick pencil lines,
spending no more than five minutes laying out the composition and making sure
that the image would fit on the page. The sketchbook I used has thick, smooth
watercolour paper and can take quite a lot of layering without getting too
buckled.
Step Two
Then straight in with the first layer of colour!
A mixture of Indian Yellow (WN) with Opera Rose (WN) to paint in the first
light areas of colour. There’s a little Winsor Red (WN) and Indian Red (DS)
too. I tend to work in three stages, starting with light colours and tones, before
moving on to mediums and finishing with dark areas and smaller details.
Step Three
It was a bright but cold day when I made the
sketch so lots of strong shadows. I combined Cobalt Blue (WN) with Mauve (WN),
mixing that in with the original wash to add a second layer to the sketch. I
find this adds more dimension to the surface of the building.
Step Four
I realised that I needed to add more of the
street scene, so I used my fineliner pen to add details to the roof, parked
cars, balconies and railings. It is always nice to include all the street
‘furniture’ in an urban sketch. Quick figures add a sense of scale too.
Step Five
I was focussing on one particular building but
wanted to indicate something of the surrounding street. I added simple lines with
the water brush to indicate the roof tops and used the fineliner pen to add
some pattern from the many balconies which served as a way to link in with the
main building.
Step Six
Time to take a look at the overall image and see
if I have missed out any important details. Sometimes I will take a photo on my
phone as this can help view the sketch in a different way. Turning the
sketchbook upside down is another way to check how things are going. I often
use a white gel pen to work on top of the watercolour at this stage too.
Step Seven
I have found that adding the date and location
to be a small but important step when I work in my sketchbook. Although looking
back I can often remember how I felt when I made the sketch, it is amazing how
quickly you can forget when it was made. It is also good to see how my drawing
ability develops.
Step Eight
Here’s the final sketch photographed against the
scene that I had been drawing. I think that I spent about an hour working on
it. Some bits work well, others are not as successful, but I’ve enjoyed sitting
here, drawing and watching the world go by.
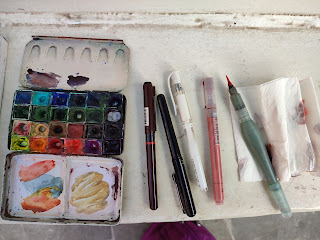
For the sketch I used:
Stillman & Birn Beta sketchbook (8 x 10
inches)
Travel watercolour tin with mainly Winsor &
Newton (WN) colours plus a few Daniel Smith (DS) additions
Water brush
Tissue
Rotring ‘Tikky’pen 0.3
Pentel brush pen
Uniball white gel pen
Derwent Paint pen
For the latest information about the next London
Urban Sketchers Sketchcrawl, check the blog at urbansketchers-london.blogspot.com or follow on Instagram @urbansketcherslondon.
My illustration portfolio is at liswatkins.com and I’m on Instagram @lineandwash.


